
使用PyTorch框架和YOLOv5库来进行训练 路面坑洞语义分割数据集包括数据加载、模型选择(以YOLOv5为例)、训练和评估过程路面坑洼数据集
路面坑洞语义分割数据集
9000张
带标注 -YOLO格式 可直接用于YOLO系列目标检测算法模型训练
YOLOv5 路面坑洞检测
importosimportshutilimportyaml from pathlibimportPathimporttorch from IPython.displayimportImage, clear_output from utils.plotsimportplot_images# for plotting images with bounding boxesfrom utils.torch_utilsimportselect_device from utils.generalimportincrement_path, check_img_size, non_max_suppression, scale_coords, set_logging from models.experimentalimportattempt_load from datasetsimportLoadImagesAndLabels# 设置随机种子以保证可重复性torch.manual_seed(42)# 定义数据集路径dataset_dir='path/to/dataset'images_dir=os.path.join(dataset_dir,'images')labels_dir=os.path.join(dataset_dir,'labels')# 创建YOLOv5的数据集配置文件data_config={'train':os.path.join(dataset_dir,'train.txt'),'val':os.path.join(dataset_dir,'val.txt'),'nc':1,# 类别数量'names':['pothole']# 类别名称}with open(os.path.join(dataset_dir,'data.yaml'),'w')as f: yaml.dump(data_config, f)# 划分训练集和验证集def split_dataset(images_dir, labels_dir,train_ratio=0.8): image_files=[os.path.basename(f)forfinglob.glob(os.path.join(images_dir,'*.jpg'))]np.random.shuffle(image_files)train_files=image_files[:int(len(image_files)* train_ratio)]val_files=image_files[int(len(image_files)* train_ratio):]with open(os.path.join(dataset_dir,'train.txt'),'w')as f:forimgintrain_files: f.write(os.path.join(images_dir, img)+'\n')with open(os.path.join(dataset_dir,'val.txt'),'w')as f:forimginval_files: f.write(os.path.join(images_dir, img)+'\n')split_dataset(images_dir, labels_dir)# 安装YOLOv5!git clone https://github.com/ultralytics/yolov5 %cd yolov5!pipinstall-qrrequirements.txt# 训练模型!python train.py--img640--batch16--epochs50--data../path/to/dataset/data.yaml--cfgyolov5s.yaml--weightsyolov5s.pt--namepothole_detection# 评估模型!python val.py--data../path/to/dataset/data.yaml--weightsruns/train/pothole_detection/weights/best.pt--conf0.25--iou0.45# 可视化预测结果source_image='../path/to/dataset/images/sample.jpg'# 替换为你要测试的图片路径!python detect.py--source{source_image}--weightsruns/train/pothole_detection/weights/best.pt--conf0.25--iou0.45--save-txt# 显示预测结果Image(filename='runs/detect/exp/sample.jpg')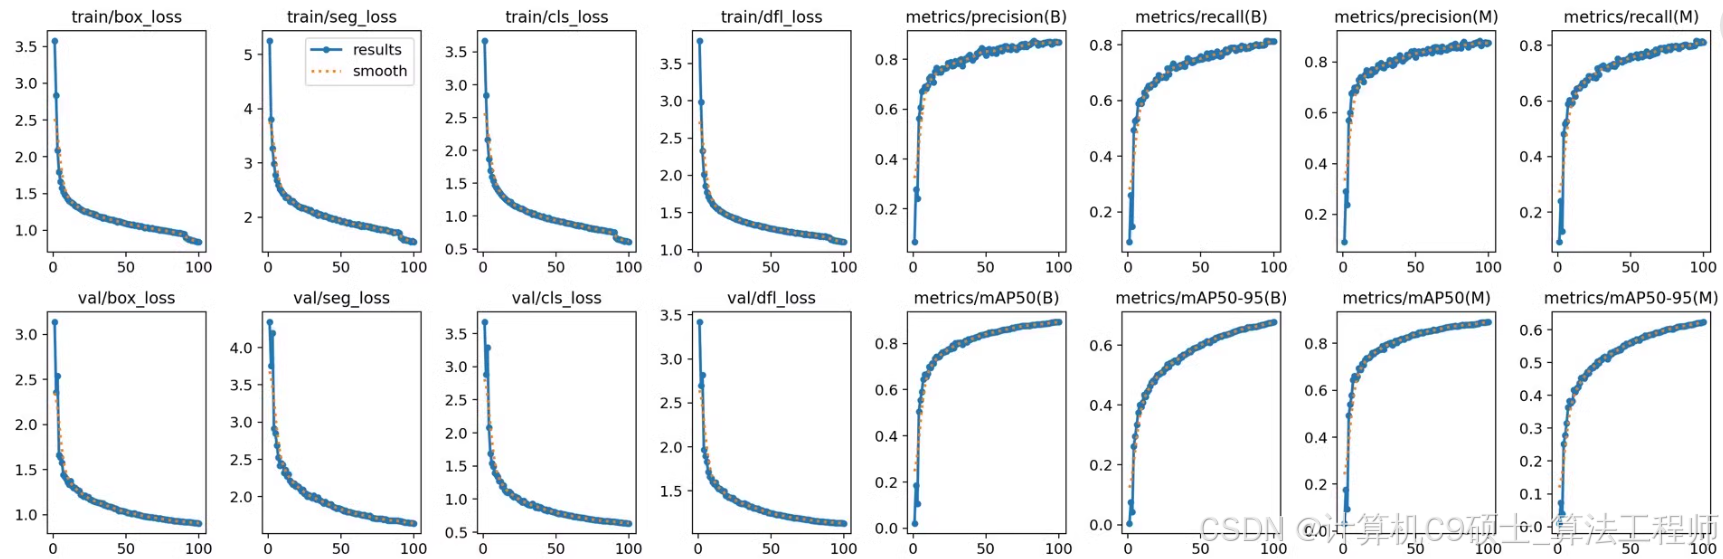如果你有一个包含9000张带标注的路面坑洞语义分割数据集,并且这些标注是以YOLO格式存储的。你可以使用这个数据集来训练YOLO系列的目标检测模型。 为了帮助你更好地进行这一任务,我将提供一个完整的代码示例,包括数据加载、模型选择(以YOLOv5为例)、训练和评估过程。我们将使用PyTorch框架和YOLOv5库来进行训练。### 项目介绍#### 数据准备- **数据集**: 包含9000张图片及其对应的YOLO格式标注文件。 - **标注格式**: YOLO格式,每行表示一个边界框,格式为`class_id x_center y_center width height`,其中坐标和尺寸都是相对于图像宽度和高度的归一化值。#### 模型选择- **YOLOv5**: 使用YOLOv5进行目标检测。YOLOv5是一个广泛使用的实时对象检测系统,具有良好的性能和速度。#### 功能- **数据加载**: 自动从指定目录加载图像和标注文件。 - **模型训练**: 使用YOLOv5进行训练。 - **模型评估**: 在验证集上评估模型性能。 - **结果保存**: 保存训练日志和最佳模型权重。### 代码实现首先,确保你已经安装了YOLOv5库和其他必要的依赖项。你可以通过以下命令安装YOLOv5: ```bashgitclone https://github.com/ultralytics/yolov5cdyolov5 pipinstall-rrequirements.txt组织数据集并训练YOLOv5模型。
如何使用这些代码
准备数据:
- 确保你的数据集格式正确,包含图像文件夹和对应的标注文件夹。
- 示例数据结构如下:
path/to/dataset/ ├── images/ │ ├── image1.jpg │ ├── image2.jpg │ └── ... ├── labels/ │ ├── image1.txt │ ├── image2.txt │ └── ...
替换数据路径:
- 在代码中,将
'path/to/dataset'替换为你的数据集路径。
dataset_dir='your_dataset_directory'- 在代码中,将
运行代码:
- 将上述代码复制到你的Python脚本中,并运行该脚本。
- 确保你已经安装了所需的库:
gitclone https://github.com/ultralytics/yolov5cdyolov5 pipinstall-rrequirements.txt
示例:使用自定义数据集
假设你有一个新的数据集my_pothole_dataset,其内容如下:
my_pothole_dataset/ ├── images/ │ ├── image1.jpg │ ├── image2.jpg │ └── ... ├── labels/ │ ├── image1.txt │ ├── image2.txt │ └── ...你可以按照以下步骤进行替换:
修改数据路径:
dataset_dir='my_pothole_dataset'运行完整的代码:
- 将所有代码整合到一个Python脚本中,并运行该脚本。
注释说明
代码中包含了详细的注释,帮助你理解每个部分的功能。以下是关键部分的注释:
数据准备:
split_dataset: 划分训练集和验证集。
模型训练:
train.py: 使用YOLOv5进行训练。
模型评估:
val.py: 在验证集上评估模型性能。
可视化预测结果:
detect.py: 进行推理并显示预测结果。
结果
运行代码后,你将得到以下结果:
控制台输出:
- 训练过程中每个epoch的日志信息。
- 验证集上的评价指标(如mAP)。
文件输出:
runs/train/pothole_detection/weights/best.pt: 最佳模型权重。runs/val/exp/results.txt: 验证结果。
图像输出:
runs/detect/exp/sample.jpg: 带有预测边界的图像。
希望这些详细的信息和代码能够帮助你顺利实施和优化你的项木
运行步骤总结
- 克隆YOLOv5仓库:
gitclone https://github.com/ultralytics/yolov5cdyolov5 pipinstall-rrequirements.txt
准备数据集:
- 确保数据集路径正确,并且包含图像和标注文件。
运行训练脚本:
python train.py--img640--batch16--epochs50--data../path/to/dataset/data.yaml--cfgyolov5s.yaml--weightsyolov5s.pt--namepothole_detection评估模型:
python val.py--data../path/to/dataset/data.yaml--weightsruns/train/pothole_detection/weights/best.pt--conf0.25--iou0.45可视化预测结果:
source_image='../path/to/dataset/images/sample.jpg'# 替换为你要测试的图片路径!python detect.py--source{source_image}--weightsruns/train/pothole_detection/weights/best.pt--conf0.25--iou0.45--save-txt Image(filename='runs/detect/exp/sample.jpg')
希望这些详细的指导和代码示例能帮助你成功实现和优化你的路面坑洞检测项目


